How to build responsive web designs for any screen size
A guide to CSS flex-box. Learn how to create responsive and adaptive layouts for all devices.
Learn how to design responsive layouts to fit any screen size beautifully. Learn the design and development principles for responsive user experiences. Responsive design is a key concept for web applications, web design, mobile apps, and web development.
Building a great user experience (ux) involves reaching users where they are. This article will give you the basic concepts to design for mobile users and more. Take your designs further by learning how programming languages like CSS make user interfaces (UI) responsive).
What this article will cover
We will discuss the basics of responsive web design and development. Starting with the core concepts of responsive design. Next, learning about layout types, CSS Flex-box, and some tips for designing in Figma.
Who is this article for
This article is for anyone who wants to how to design responsive web interfaces. We want to empower you to create UI fit for any device size. Designing is half of the equation, we want to go further to enable your developer to build your UX. Learn the two halves of responsive design to deliver UX your users love.
Why is responsive design important
In the early days of the internet, monitors had a fixed aspect ratio. Meaning screens had a fixed width and height. As more devices got internet access, different screen sizes came to market.
At first, the user experience on these devices were limited. Mobile sites were nothing more than text and low-resolution images. As devices became more advanced, fully-featured mobile UX became possible. Now, mobile user experience is a vital part of nearly all web design.
What is responsive web design
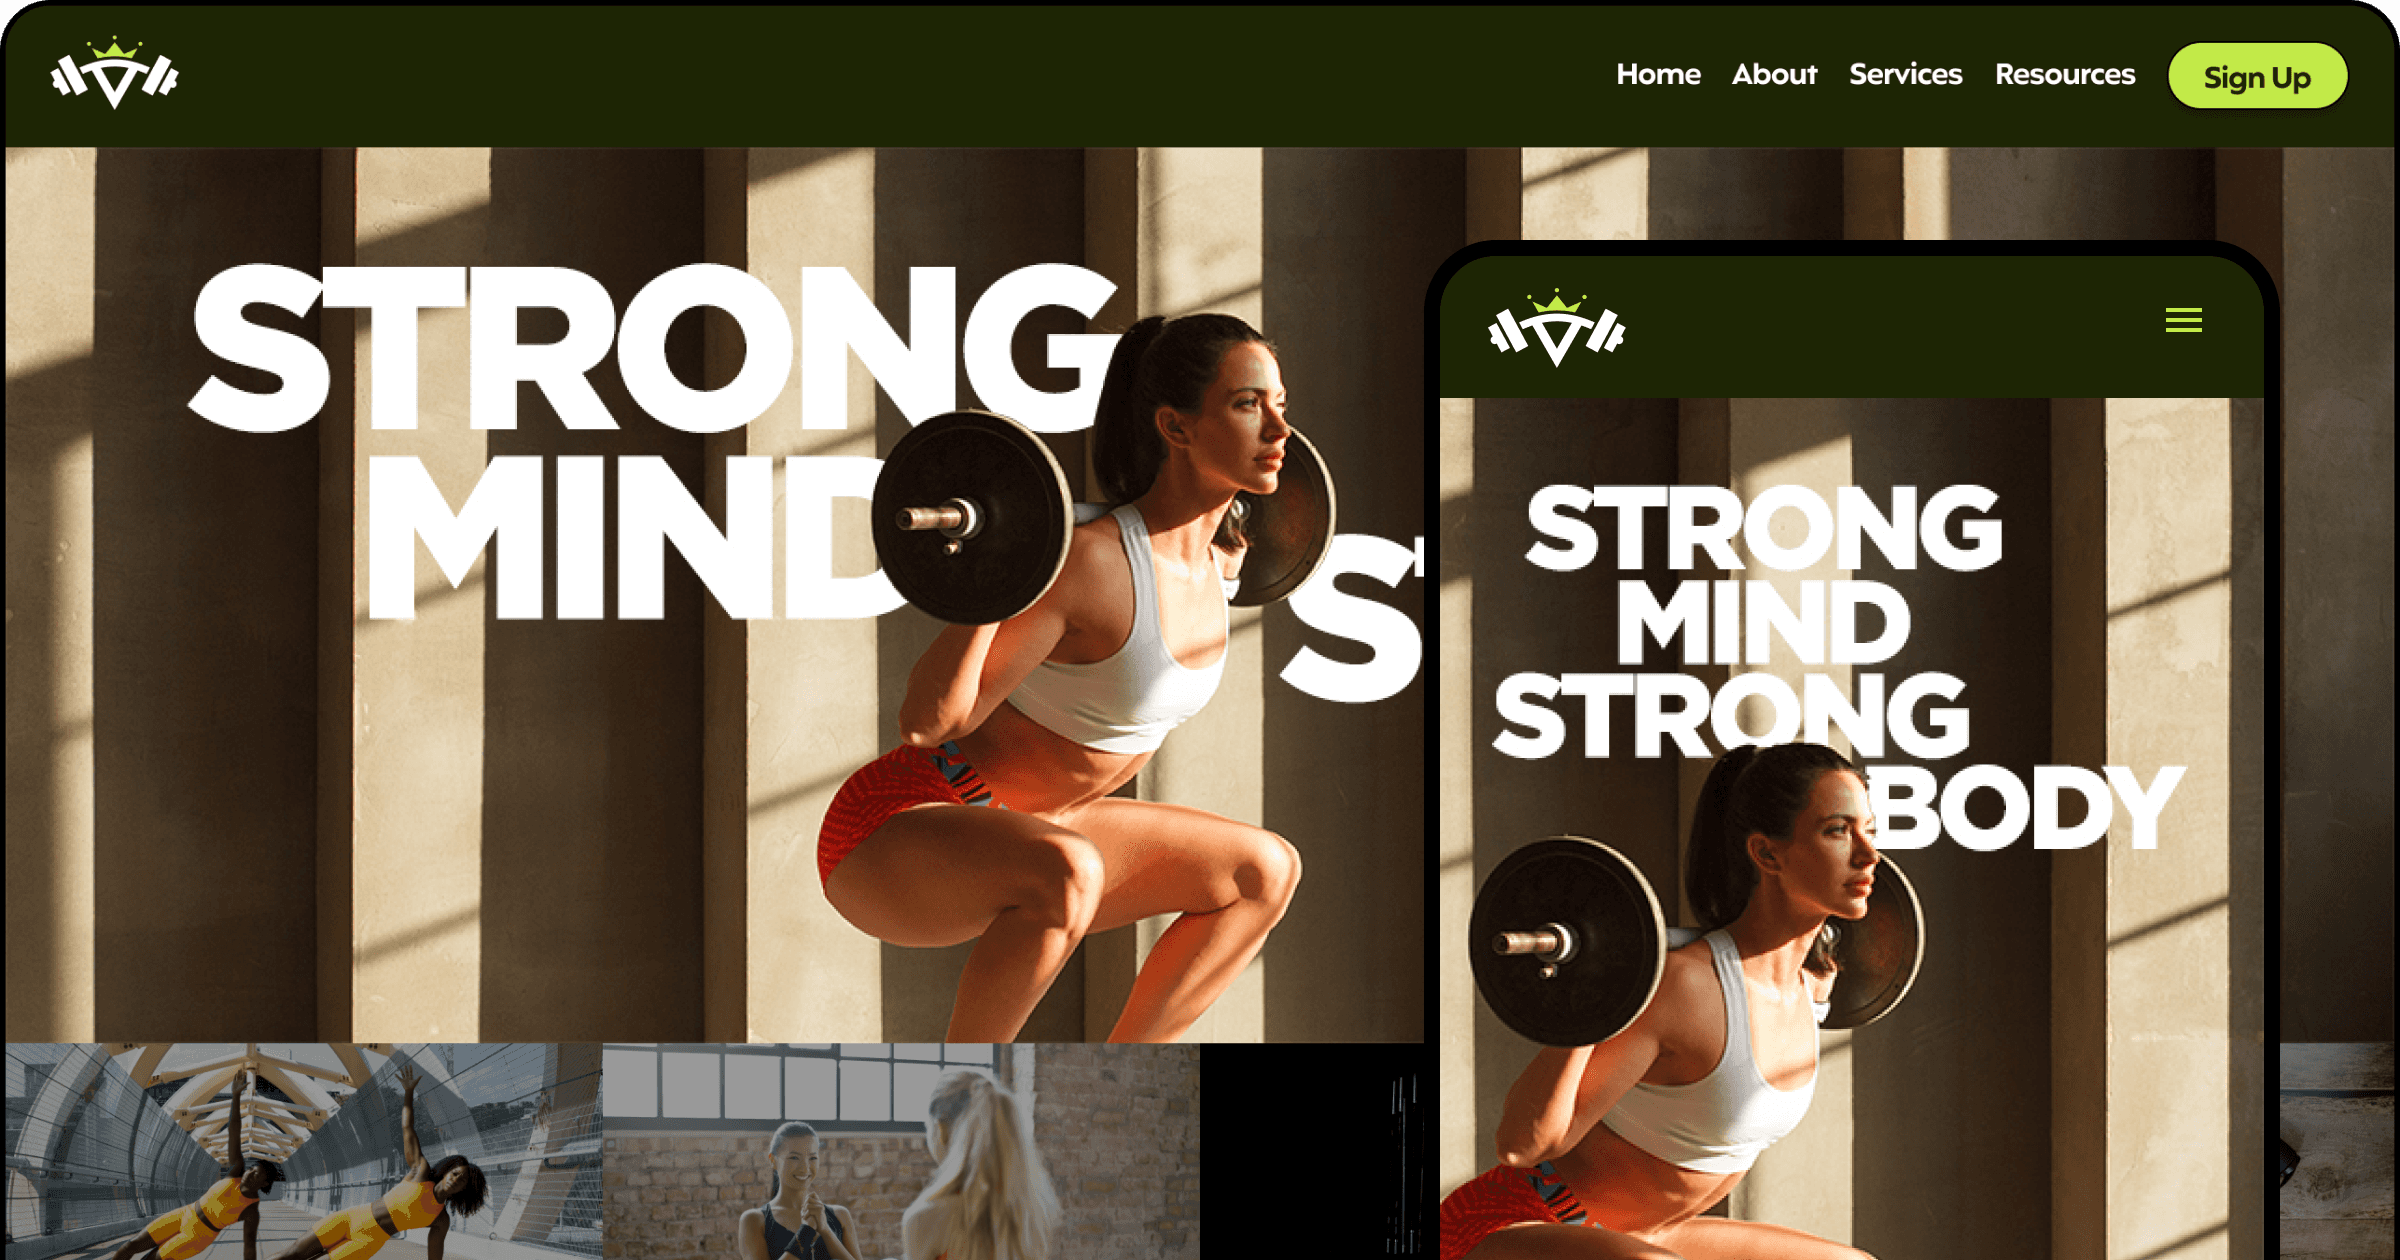
Laying out visual elements to resize gracefully from small screens to larger screens. The goal is to make UI look great on mobile devices, tablets, and personal computers. Using UX design principles so web pages function well at all breakpoints.
What is a breakpoint
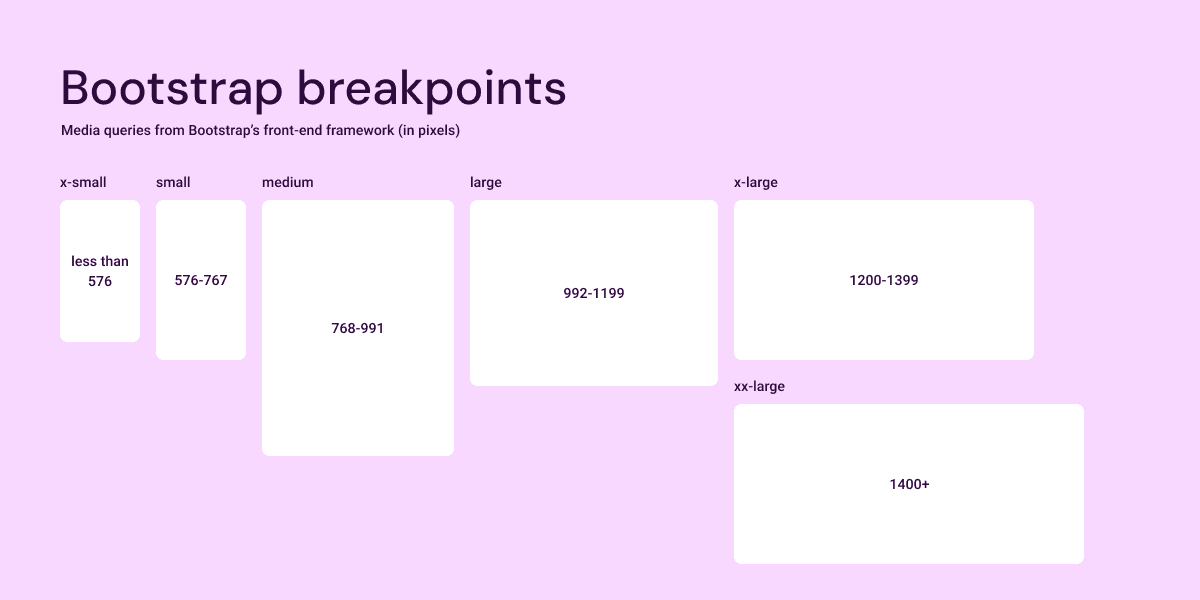
A breakpoint defines a screen size where a design should adjust to a different layout. Designers can create responsive layouts for a specific range of device sizes. Developers create CSS media queries where css code overrides default style properties.
Bootstrap is a common framework for the front-end code for a website. Using a mobile-first approach to design for mobile phones. A developer can choose the default breakpoint design to be mobile or desktop first.
What is a media query
A media query sets a breakpoint for a user interface in CSS. By default, styles apply to a web design's HTML code. A media query let's developers override the style of a website at a certain screen size. In most cases, developer's will design mobile first.
How to add media queries in your CSS code
What are the two main types of responsive layouts
The two main types of responsive web design are fluid layouts and adaptive layouts.
Fluid responsive layouts
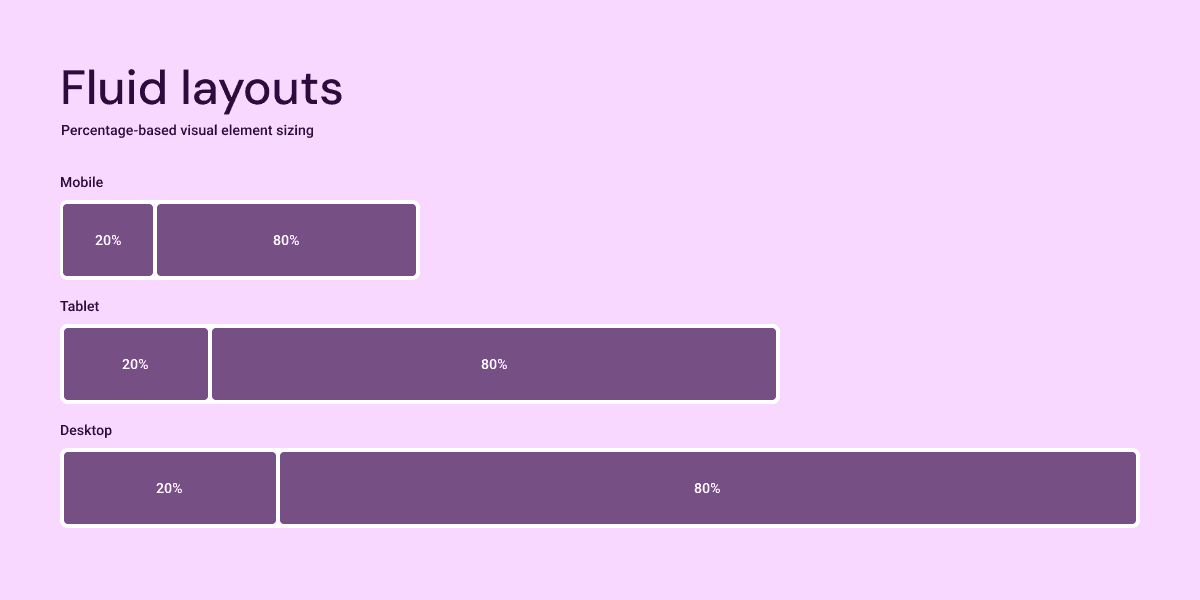
Fluid layouts stretch to fit their parent container. Using percentage-based values to resize based on the viewer's browser size.
Adaptive responsive layouts
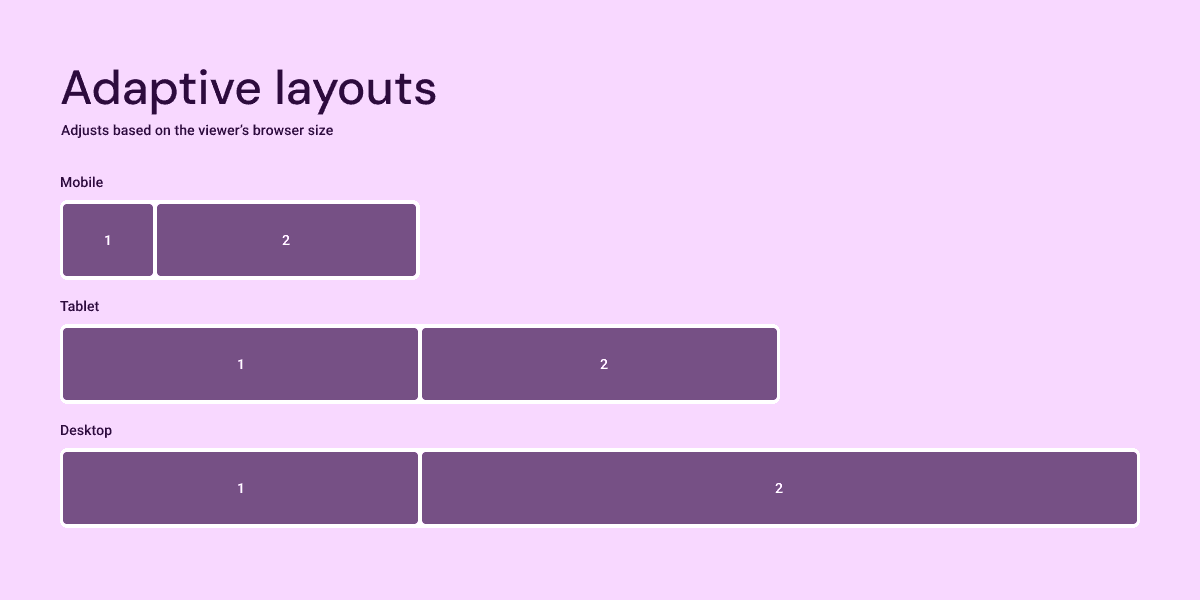
Adaptive layouts are custom user interface designs for screen sizes. Each screen resolution may have unique code to achieve the desired layout.
How to combine responsive layout types
To get the most out of responsive design, designers and developers can combine layout types. The main benefit of combining approaches is visible with the odd sizing between breakpoints.
The type of responsive layout you use depends on what you are designing. In most case its not about which using them separately, but combining both.
What exactly is the Flexbox model and how does it work?
The flexible box model is a CSS layout method to achieve responsive layouts. CSS flexbox applies to HTML elements, to size items based on the space available. Providing a better way to lay out, align, and distribute space in a container.
Anatomy of Flex-box layouts
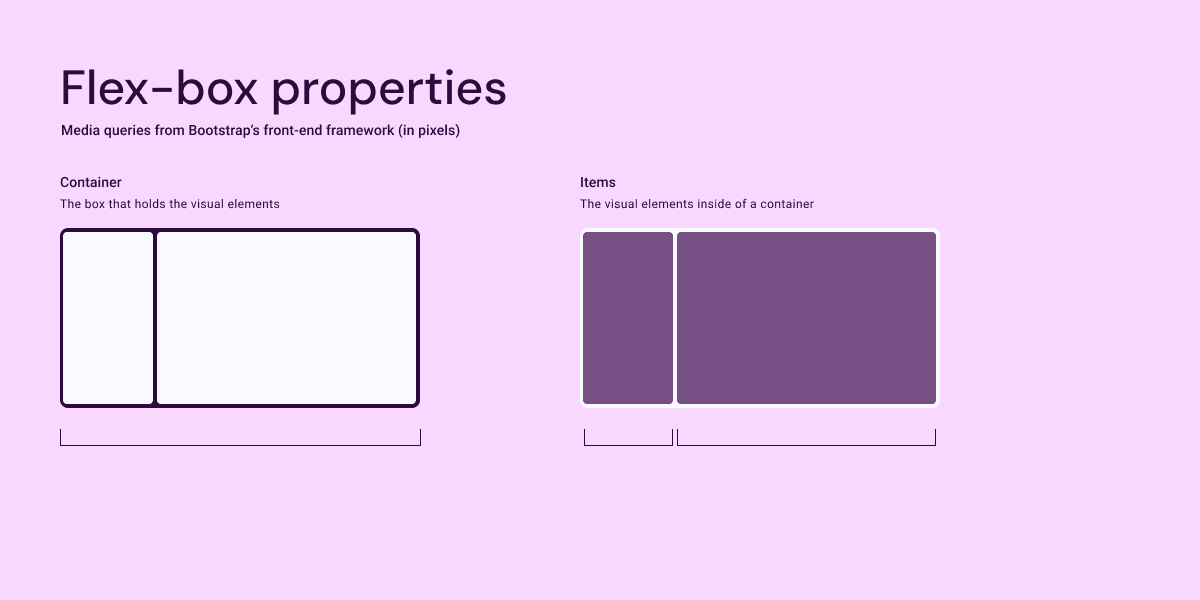
Containers
The flex-box property applies to the box holding HTML elements. The parent container may be the page, a section, or portion of a user interface. Container's have specific styling properties we will cover later on in this article.
Items
The elements contained within a flex-box container. CSS properties determine how these elements lay out in a parent container. Items have CSS properties we will cover later on in this article.
What are the CSS properties for a flex-box container
Display
Set the display property to flex (or inline-flex) to enable flex-box layouts.
Flex Direction
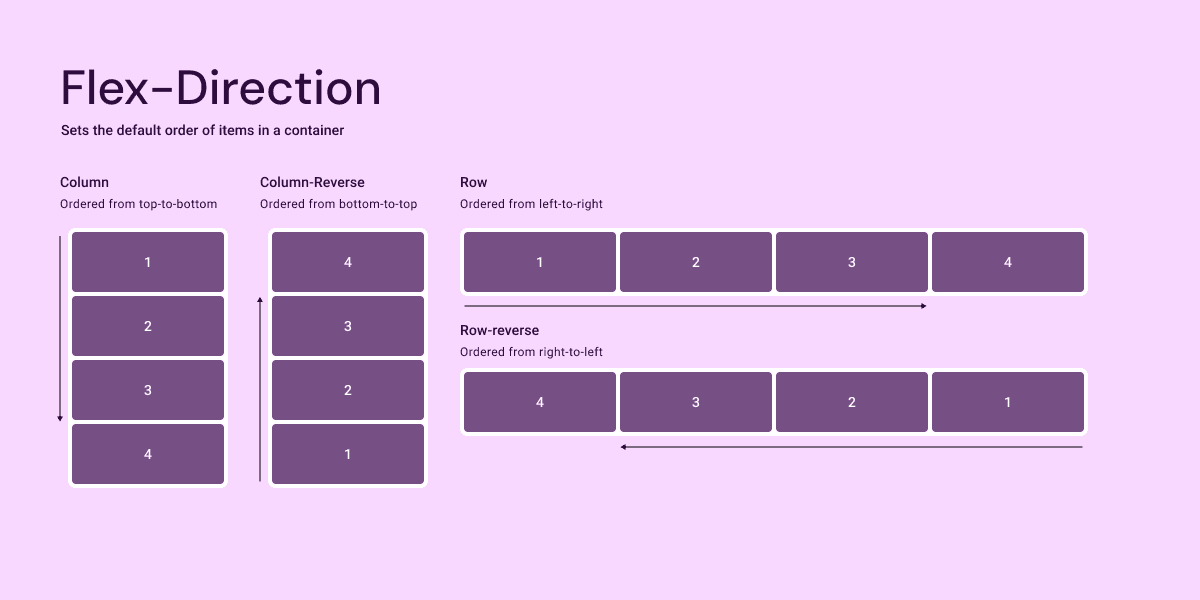
The Flex-direction property sets the order of child items in a flex-box container. The two main types include: column-layout and row-layout. Adding -reverse changes the order in the opposite direction.
Column: Orders the container's items from top-to-bottom
Column-reverse: Orders the container's items from bottom-to-top
Row: Orders the container's items from left-to-right
Row-reverse: Orders the container's items from right-to-left
Flex-wrap
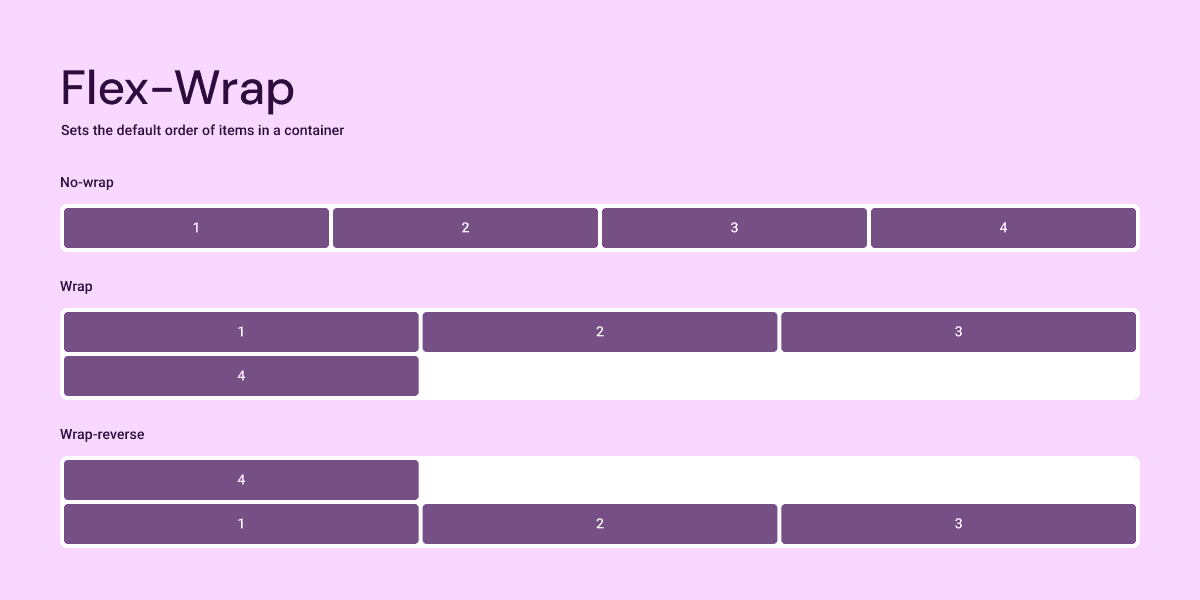
Items within a flex-container lay out on a single line by default. Adding the flex-wrap property lays overflow items on multiple lines, as needed.
No-wrap: All items remain on one line
Wrap: Items wrap on multiple lines from top-to-bottom
Wrap-reverse: Items wrap on multiple lines from top-to-bottom
Flex-flow
A quick way to set the flex-direction and flex-wrap properties with a single CSS shortcut. The flex-flow CSS property should be the flex-direction followed by flex-wrap, with one space in-between.
Justify-content
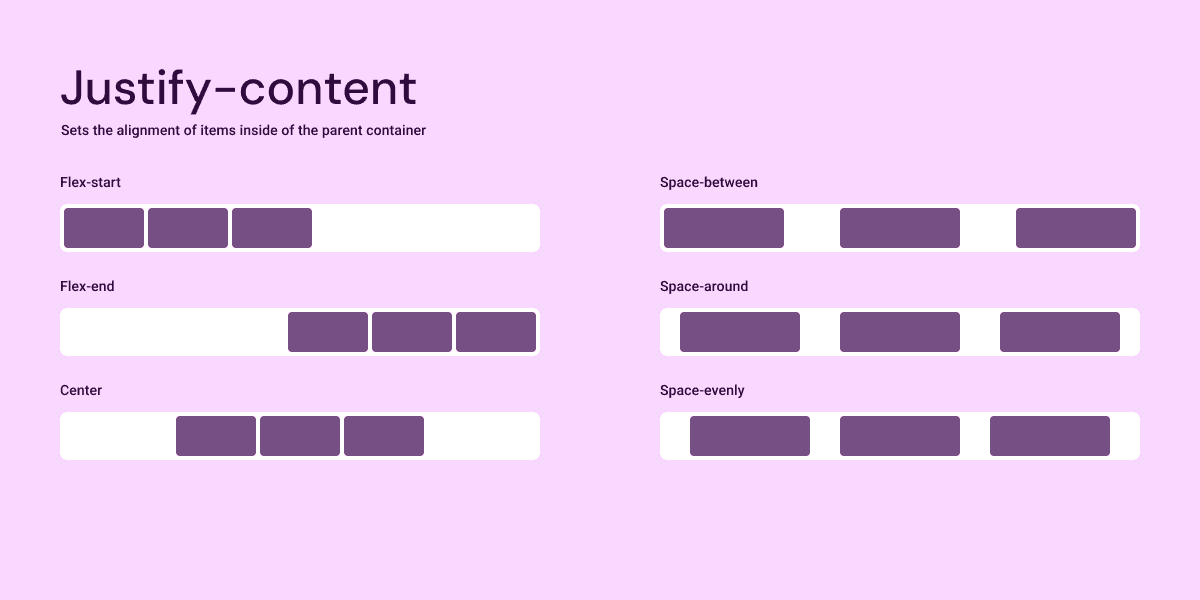
Set the alignment of items within a flex-container with the justify-content property. The 6 options include:
Flex-start: Aligns items at the beginning of the container
Flex-end: Aligns items at the end of the container
Center: Aligns items in the middle of the container
Space-between: Aligns items evenly without space on either side of the container
Space-around: Aligns items evenly with half of the set space on either side of the container
Space-evenly: Aligns items evenly with the same amount of space on either side of the container
Align-items
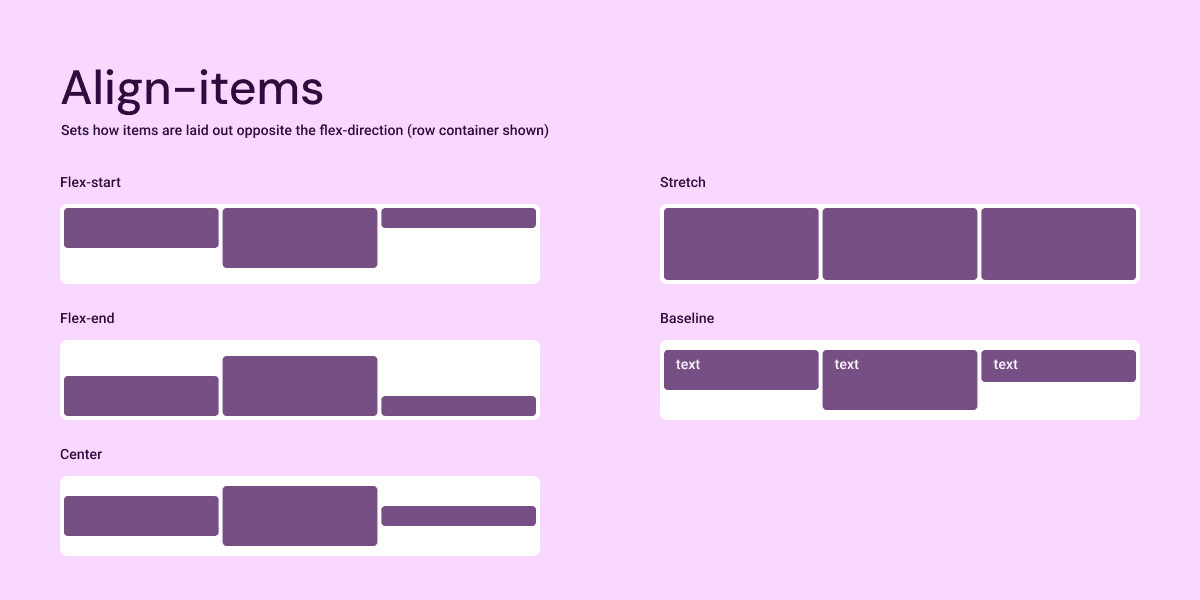
Sets items opposite the flex-direction. For row containers, this property sets the vertical alignment of child items. In column containers, this property sets the horizontal alignment of child items.
Flex-start: Sets items to the start of the cross-axis
Flex-end: Sets items to the end of the cross-axis
Center: Sets items to the middle of the cross-axis
Stretch: Expands items to fill the cross-axis
Baseline: Sets items so the baseline (bottom) of visual elements align
Align-content
When there are multiple lines of items in a flex-container, this property sets the alignment of the cross-axis. Similar to align-items, which impacts a single line of items.
Flex-start: Sets rows of items to the start of the cross-axis
Flex-end: Sets rows of items to the end of the cross-axis
Center: Sets rows of items to the middle of the cross-axis
Stretch: Expands rows of items to fill the cross-axis
Space between: Sets rows of items evenly without space on either side of the container
Space around: Sets rows of items evenly with half the space on either side of the container
Space evenly: Sets rows of items evenly with even space on either side of the container
Gap-spacing
Controls the amount of spacing between items in a flex-container.
Gap: Controls the row and column gap between child items
Row-gap: Controls the amount of space between rows
Column-gap: Controls the amount of space between columns
What are the CSS properties for items in a flex-box container
Order
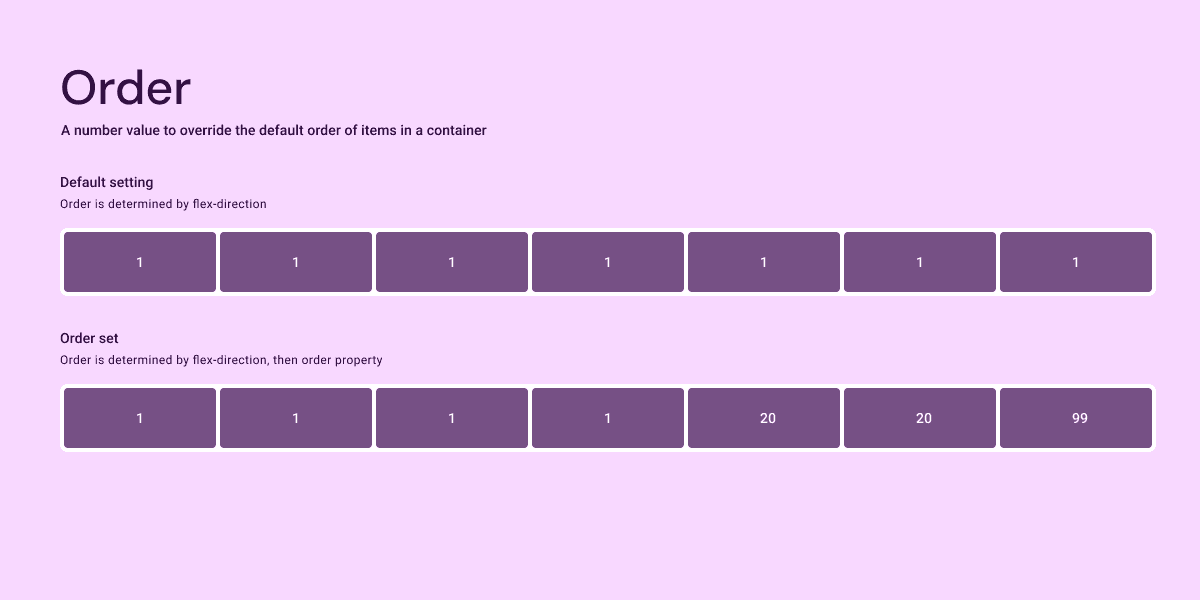
The order property is available on items in a flex-container. The flex-direction sets the default order of items. Override how things display with a number value. The default value is 0.
Flex-grow
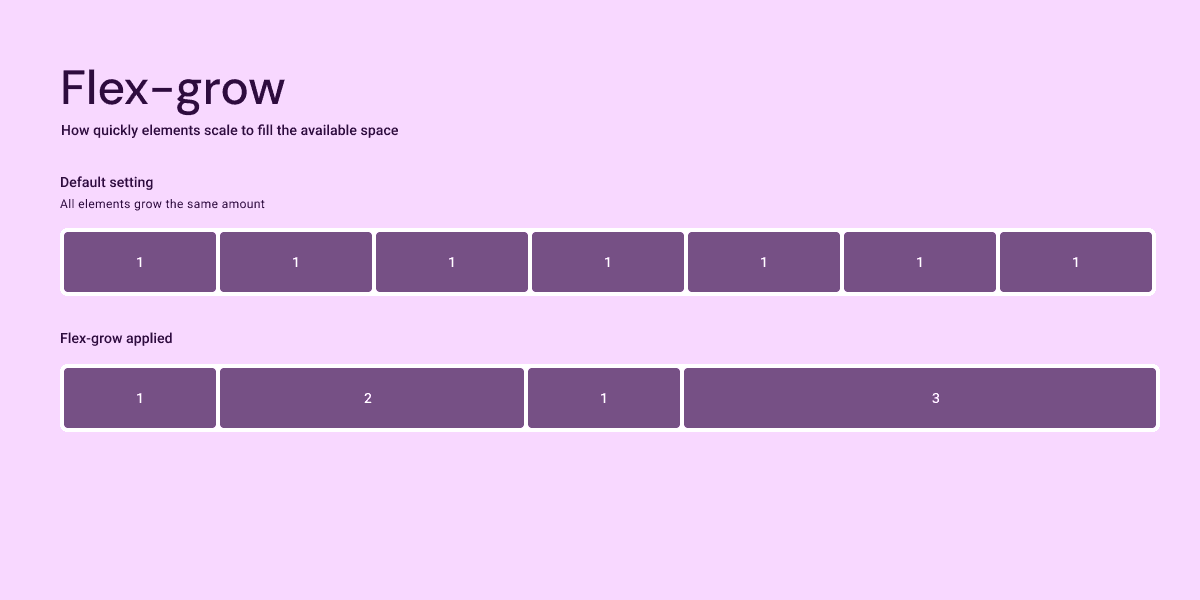
Determines how much an element grows to fill the available space within a container. By default all elements grow the same amount. This value makes elements grow more when shifting from smaller screens to larger viewports.
Flex-shrink
Determines the ability for a child-item to shrink if needed. Flex-shrink is a helpful property if the items in a container are larger than the available space.
Flex-basis
Sets the initial size of a flex-item. Flex-basis determines the size of an element before adding any additional space from the flex-box container. Check out how flex-basis impacts items here.
Flex
A shorthand way to include flex-grow, flex-shrink, and flex-basis on one CSS property.
Align-self
This property overrides the align-items property from the container, on a single item. Using the same values as the align-content property on the container.
Flex-start: Sets rows of items to the start of the cross-axis
Flex-end: Sets rows of items to the end of the cross-axis
Center: Sets rows of items to the middle of the cross-axis
Stretch: Expands rows of items to fill the cross-axis
How to design responsive layouts in Figma
What is Figma
Figma is a cloud-based design tool that includes design, prototyping, and collaborative tools. Used by teams world-wide to create user experience designs. Figma is a top choice for web design, digital product design, and more.
What is Auto-layout
Figma has a feature called auto layout for responsive web design. Adding auto layout to design elements is the same as CSS flex-box in code. Visual elements and containers may have dynamic or fixed sizes based on their parent container.
The feature lets designers apply padding, layout (row/column), gap-spacing, and dynamic sizing. Using auto layout is a nearly one-to-one match to flex-box.
How to use Auto-layout
Figma has the concept of frames as containers. Frames are boxes used to make up a user interface. Use auto-layout or create a responsive frame layout. Combine frames to build up a user interface, matching frames to div containers.
https://www.youtube.com/watch?v=TyaGpGDFczw
What are some tips to consider on specific devices
What to consider when designing for mobile phones
Inputs
People use gestures, virtual keyboards, and voice to interact with their mobile devices. People usually want to use their personal data to get things done quickly. Consider ways to support these user interactions for an ideal user experience.
Ergonomics
Consider how people interact with their mobile devices. People usually hold their phone with both hands, interacting with the screen with their thumbs. With this in mind, think about what your users can reach easily on their screen.
Best practices
Help people complete the most important task at that moment. Limit the number of buttons and details to improve their user experience.
Gracefully adapt to user appearance preferences like layout, dark mode, and dynamic type sizing.
Keep actions in the middle or bottom of the screen so they are easier for people to interact with.
Ask user's for permission to use their device's data to make it easier to complete tasks
What to consider when designing for tablets
Inputs
People use gestures, virtual keyboards, physical keyboards, stylus and voice to interact with their mobile devices. People usually want to use their personal data to get things done quickly. Consider ways to support these user interactions for an ideal user experience.
Ergonomics
People may hold their tablet or set it on a surface/stand. In most cases tablet's are within 3 feet of the person when in use. Test user experiences in portrait and landscape mode to deliver seamless UX.
Best practices
Use the larger display to focus users on the most important actions. Keep other actions out of the way, but easy to access.
Consider the on-screen keyboard and interactions in different screen modes to deliver great interaction design.
Design for native gestures on different tablets.
Ask user's for permission to use their device's data to make it easier to complete tasks
Wrapping up
Creating responsive designs is vital to provide great user experiences. By learning how to build and design responsive layouts, you can create great interfaces for all device sizes. Learning flex-box gives designers the foundation to build responsive designs for most no-code design tools.
Responsive design improves usability for your target audience. Whether you're building a mobile-first design, or combining responsive layouts to build your design. Build user interfaces with responsive concepts and apply best practices for each device size to deliver great experiences.
